Quality, Services : Water Damage Restoration Tips Fort Stockton Texas
We offer Water Damage Restoration Tips services in Fort Stockton Texas, call us today!
Your Full-Service, 24 Hour Water Damage Restoration Tips in Fort Stockton Texas
✅Call .When calling any Water Damage Fort Stockton Texas Restoration Tips contractor, the majority of the time, that's all they can handle is water damage. That indicates they will certainly be available in and also do your water damage restoration and extraction leaving you to grab the items. At 24/7 Catstorng LLC, we do so a lot more than that. We are your full-service water reduction firm aiding you from the factor you call us till your office or home is back to its original condition.
What Goes Into Fort Stockton Water Restoration?
When a home is damaged because of fire or smoke a repair company might offer the adhering to solutions to their customers; storage of family items, cleaning, upkeep of the residences supply both compromised as well as non-restorable, removal of materials, deodorization, restoration, emergency protecting of the scene, packaging, furniture refinishing and also reupholstering and fixing of electronics and home appliances.What does a flood restoration company do?
Flooding restoration service can successfully and also efficiently fix the carnage triggered by flooding as well as offer you with water damages restoration that will certainly leave home, furnishings, and ownerships tidy, completely dry, and also ready for company, laid-back living.Previously Fort Stockton Texas swamped streets were lined with water-damaged furnishings and also roads loaded with vehicles as homeowners went searching for cleaning up supplies, insurance price quotes and repair assistance.
Having an expert Water Damage rug cleaning saves you a big headache when a water damaged carpet is entailed and bring your carpeting to life with rug repair work and also forget the problem of cleansing it yourself and ask for a professional as well as extensive rug cleansing.
What is water damage repair? - Restoration Tips Fort Stockton Texas
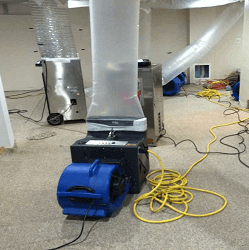
Prompt repair service of broken or deteriorated roofing materials by a professional professional roofer will aid protect against interior water damages as well as mold damage in Fort Stockton. Catstrong water damages restoration, drying, deodorization, decontamination, disinfection, water damage repair work, restoration as well as reconstruction of domestic and business residential or commercial properties damaged by fire, water and other catastrophes by a network of skilled experts, professionals as well as restoration. Carpet fixing specialists have access to devices and techniques that will extensively clean your water damaged rug and eliminate mold that may have resulted.-
water damage home
-
water damage inspection
-
water damage near me
-
water damage restoration
-
water damage types
-
water damage restoration services
-
water damage iicrc standard
-
water damage restoration tips
-
water damage damage water
-
water damage insurance cover water
-
water damage repair
-
water damage articles
-
water damage restoration water removal
-
water damage homeowners insurance cover
-
water damage insurance
-
water damage cover
-
water damage house
-
water damage extraction
-
water damage removal
Fort Stockton Texas Water Damage Chruches Fort Stockton Texas 79735
Just how are water damage contents cleaned up?
Carpet repair service experts in Fort Stockton are accredited in a variety of areas when it involves carpet cleaning, one of them being the handling as well as cleaning of water harmed carpets. When it comes to a water harmed rug, fail to remember doing the rug fixing on your own and also obtain a Water Damage expert rug cleansing in Fort Stockton. We provide a large range of services like: mold water, removal and fire damage repair work, rug cleansing, basic construction as well as lots of various other water damages solutions in Fort Stockton.No matter where the devastation comes from, be it all-natural flooding, ruptured pipes, or considerable rainfall storms without adequate drain, water damages restoration specialists have the experience, devices, and treatment programs that eliminate wetness in the home as well as dramatically minimize the probability of mold in wall surfaces, floorings, and duct. A water harmed carpeting requires professional carpet repair work to bring it back to its previous state of being a tidy rug. A reconstruction expert could control mold and mildew as well as repair the water damage.
What to look for in a water damage Water Damage company?
Is a reputed water damage remediation company providing reliable solutions for water damages fixing in a number of parts of Fort Stockton, Texas. If you are living within Fort Stockton, Texas flood-zone area, much better make an early reservation with Catstrong; you can inquire about water damages repair in Fort Stockton, water damage removal, tornado damages repair service, and flood damages repair in Fort Stockton. Our specialists at Catstrong LLC Fort StocktonTexasprovide house owners with assurance with our specialist Water Damage flooding damages cleaning services that assists you to clean up your property that has actually suffered flooding damages.The following sources provide even more details regarding water damage and also its results.
- Fungal Species and Water-Damaged Building Materials: This short article discusses how water damages encourages fungi growth on building materials.
- Response to Water Damage: The Environmental Protection Agency supplies a graph to direct property owners as well as local business owner in replying to water damage.
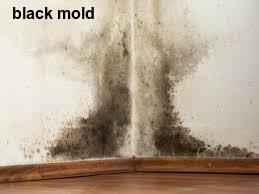
- Mold: A Health Hazard: This article from the Federal Emergency Management Agency discusses the threats of mold, which can create when constructing materials are exposed to water.
- Water-Damaged Wood Furniture PDF: This source offers a number of pointers for salvaging water-damaged timber furnishings.
- Floods and Water Damage: The American Lung Association clarifies the health hazards of water damages.
Tidying up After a Flood: The University of Minnesota Extension describes the safety equipment needed and also procedures made use of to clean up the water damages from a flooding. - Restoration Guidelines and Criteria PDF: This file contains details about the repair of houses and also services damaged by water.
- Cleaning Flood-Damaged Carpets and Rugs: This post offers useful guidance for those that wish to conserve their water-damaged carpetings and rugs.
- Guidelines on Indoor Fungi Removal PDF: This document explains health effects of fungi indoors and discusses proper remediation procedures.
- Types of Water Damage: This article explains the different kinds of water damages that can take place in property and also business homes.
- Saving Paper Items: This resource clarifies how to protect paper products harmed by water.
- Tips for Safe Flood Cleanup: This resource offers security ideas for people who need to tidy up after significant water damage.
Additional Reviewing - Read What Other Things We Found
Do you appreciate more info about WATER DAMAGE? Write a comment down below. We will be pleased to know your suggestions about this write-up. We hope that you visit us again soon. Sharing is nice. Helping others is fun. Many thanks for your time. Kindly check our blog back soon.Solved! How to Fix a Leaking Water Heater and Prevent Future Woes
Discover the source of a water heater leak and learn the do-it-yourself steps to remedy the most common culprits.
Major Systems
Solved! How to Fix a Leaking Water Heater and Prevent Future Woes
Discover the source of a water heater leak and learn the do-it-yourself steps to remedy the most common culprits.
By Glenda Taylor
Facebook Twitter Pinterest Email
How to Fix a Leaking Water Heater
Q: Help! My hot water heater is leaking. After mopping up, I see more water starting to puddle but I can’t tell where it’s coming from. Do I need to call a plumber, or is it possible for me to fix the leaking water heater myself?
A: Water heaters can leak due to a number of problems, including loose valves, excessive pressure in the tank, or issues with the pipes that connect to the unit. And if your water heater is more than 10 years old, the leak is likely age-related—if that’s the case, it may be time to replace it. So while you might eventually need to call a plumber, depending on the location of the leak, there could be a simple DIY solution. Keep reading to find out the immediate steps to take, and then how to pinpoint the leak and remedy the problem.
Turn off the power to the leaking water heater.
If it’s a gas water heater, it will have a dial or an On/Off switch near the spot where the gas line connects. If it’s an electric water heater, locate your home’s electric service panel, and turn off the breaker labeled “Hot Water Heater” by switching it to the “Off” position.
Next, shut off the water pressure to the tank.
You’ll find two plumbing pipes attached to the top of the water heater. One is the hot water pipe that supplies hot water to your faucets and the other is the cold water supply line. Only the cold pipe will have a shutoff valve; turn that valve to the Off position to stop cold water from flowing into the tank.
RELATED: 10 Plumbing Tips Everyone Needs to Know
Do some sleuthing to find the water heater’s leak.
Water heater leaks often start out slow, just drip by drip, so it can be difficult to tell where the water is coming from. Check for wetness by running your fingers or a tissue around these three likely locations:
the fittings on the pipes above the water heater,
the drain valve near the bottom of the tank (the one with the standard garden hose connection), and
around the temperature and pressure relief (TPR) valve. The TPR valve is located on the side of the tank, and it should have a copper tube that extends out a few inches and then turns downward to the floor. The bottom of the tube is open, and you should check there for wetness as well.
If you discover the location of the leak, the following steps indicate how to fix each one.
Fixing a Leaking Water Heater
Tighten loose pipe fittings.
If water is coming from the cold water supply line and the hot water pipe, you may be able to stop the leak by tightening a loose-fitting with a wrench. This is possible if flex pipes, such as these 12-Inch Fluidmaster Braided Stainless Steel Connectors (available on Amazon), are attached between the water heater and your home’s main cold and hot water lines. Flex pipes are a common configuration, and they attach just as a garden hose would attach—a straightforward DIY fix for many homeowners. If the water pipes are solid copper, however, you will need to have a plumber repair it, because copper connections must be soldered in order to seal.
Adjust the water temperature if the leak issues from the TPR valve.
The pressure in a water heater tank depends on two things: the temperature of the water and the pressure of the water coming in from the cold water supply line. When the pressure in the tank builds to an unsafe level, the TPR valve, sometimes called a pop-off valve, opens to release the pressure. This valve—at the down-turned pipe you located earlier—is a safety mechanism designed to direct a scalding spray of water to the floor rather than the face of someone standing nearby.
If the leak is coming from around the valve itself or out of the bottom of the pipe, it could indicate that the water in the tank is too hot. Many manufacturers sell water heaters preset for 140° Fahrenheit, but the Department of Energy (DOE) suggests that 120° Fahrenheit is hot enough for most houses. The temperature control knob may or may not list actual degrees, but if not, turn it from “High” to “Medium” to reduce the temperature in the tank, and also reduce pressure, potentially stopping the leak.
Test the pressure in the cold water supply.
If the water temperature isn’t too hot, the pressure in the cold water supply line could be too high. The pressure of the water that flows into your house is controlled at the outside water meter, and if it’s 100 pounds per square inch (psi) or higher, it could be creating excessive pressure in the water heater. This can also cause water leakage from the TPR valve.
To test your water pressure, you’ll need a water pressure gauge, such as the Flow Doctor Water Pressure Test Gauge (available on Amazon), which is designed to attach to an outdoor spigot. Attach the gauge just as you would a garden hose, and make sure no other water faucets or appliances such as a dishwasher are running. Turn on the outdoor spigot and the gauge will display the pressure of the water. A psi of 80 is sufficient for most houses, but if yours is over 100, contact your municipal water authority and ask that the pressure be reduced.
Replace a leaky drain valve.
If drips are coming from around the drain valve, it should be replaced without delay. While some choose to call a plumber at this point, dedicated DIYers may be able to handle the job. First, you must drain the water heater, by attaching a garden hose to the drain valve and then running the other end of the hose to a floor drain or a shower drain. Use a flathead screwdriver to open the valve so the water drains out through the hose. Once the water has drained, use an adjustable wrench to grip the drain valve and twist it counterclockwise—it should twist right out. Take it to the hardware store when to purchase a perfect match, and then install the new valve by twisting it clockwise into the drain valve hole until it’s snug.
RELATED: The 6 Bests Things You Can Do For Your Plumbing
When to Call a Pro About Your Leaking Water Heater
Replace the water heater if the leak is at the bottom of the tank.
If during your sleuthing, you determined the leak wasn’t coming from any of the above spots, the trouble is at the bottom of the tank. Over time, sediment can settle in the bottom of a hot water heater, eventually leading to rust that eats through the bottom of the tank. The rusting process can be slowed by regularly draining and flushing out the water heater, but if the bottom is already leaking, it’s time for a new water heater. Local building codes often do not allow homeowners to install new water heaters, because gas water heaters require the installation of a gas line, which must be done by a plumber. while electric models require direct wiring of the heater into the home’s service panel—a job for an electrician.
Prevent water damage from future leaks with a leak detector.
Most water heaters are tucked away in utility closets, basements, or garages where a leak can result in massive water damage before it’s noticed. To avoid this problem, consider putting a leak detector, such as Zircon’s Leak Alert (available on Amazon), on the floor near the water heater. At the first sign of a leak, the detector emits a loud signal to alert you. The Zircon detector can also be synced with your home’s Wi-Fi system to send an alert to your smartphone or tablet should a leak occur.
| Mold Inspection Fort Stockton | Mold Testing Fort Stockton | Mold Remediation Fort Stockton |
| Mold Removal Fort Stockton | Water Damage Fort Stockton | Things to do in Fort Stockton |
Industry organizations:
Water Damage Fort Stockton Texas
Fort Stockton Texas Water Removal Services
Fort Stockton Texas Restoration Company Fort Stockton Texas Mold Removal
Fort Stockton Texas Mold Remediation Cost Fort Stockton Texas Mold Removal
Fort Stockton Texas Mold Remediation Fort Stockton Texas Mold Removal Fort Stockton Texas EPA Health Issues Fort Stockton Texas OSHA Fort Stockton Texas Water Damage Catstorng of Fort Stockton Texas Restoration Fort Stockton Texas
Catstrong of -102.87932 - Fort Stockton
Why Choose Us?
- Very Experience
- Open 24 Hours Every day
- Fast Arrival Time
- Competitive Pricing
- Accepting Credit Cards
- Quick and Honest Service
- Excellent Customer Service
- Commitment and Promise
- Embrace New Technology
| Mold Inspection | Mold Remediation |
Services Offered in Fort Stockton Texas | Restoration Tips
RSP Water Damage Restoration of Austin
2630 Exposition Blvd Suite 229 Austin, TX 78703
(512) 588-2821
https://austin.reconstructionservicepros.com/